How to Remove a Bathroom Vanity
How to Remove a Bathroom Vanity
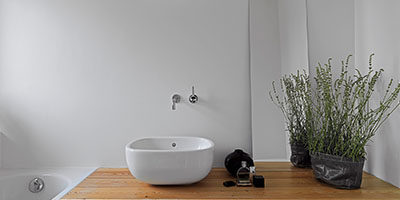
If your bathroom aesthetic no longer excites you or is in desperate need of an update to bring it into this century, upgrading the vanity is a great way to give the space a boost. Removing your bathroom sink vanity may seem like a big task, but if you follow these steps, this DIY project can be easily knocked out in a single weekend.
Preparing to Replace Your Bathroom Vanity
It’s a good idea to have a plan for what to do with your vanity after removing it. You may be able to donate or give away your used sink and vanity if it isn’t too outdated to Habitat for Humanity or list for free pickup on Facebook Marketplace or Craigslist. If it’s worn out, you may be able to put it out to the curb. However, if tearing out your vanity is just the start of a major bathroom makeover, you may want to consider renting a dumpster to handle your home renovation debris.
Before you jump into the dirty work of this job, there a few things you do to protect the rest of your bathroom from the dust and debris.
- Remove all your bathroom supplies from your vanity, sink or open shelves.
- Cover any light fixtures, vents or fans that aren’t being removed or replace with a cloth tarp.
- Pull any towels off towel racks or doors.
- Take out any trash cans, bath mats, rugs or scales so the floor is clear.
- Drape cloth tarps over your bathtub or shower.
How Much Does It Cost to Replace a Bathroom Vanity?
DIY bathroom vanity removal should be cost-free as long as you have the tools on-hand needed for the project. The part that will cost you is replacing your vanity with a new one. According to HomeAdvisor.com, installing a new bathroom vanity will cost you between $300 to $3,800, depending on what style vanity you decide on.
Tools and Gear Needed to Remove a Bathroom Vanity
A free-standing vanity will be a little less work to remove than a wall-mounted version, but either job can be done with proper research and the right tools and gear to complete the job:
- Adjustable Wrench
- Bucket
- Utility Knife
- Hammer
- Chisel
- Pry Bar
- Wood shims
- Grout Scraper
- Putty Knife
- Shop Vacuum
- Safety Glasses
- Gloves
- Boots
- Long Sleeved-shirt
- Long Pants
- Knee Pads
How to Remove Your Bathroom Vanity in Six Steps
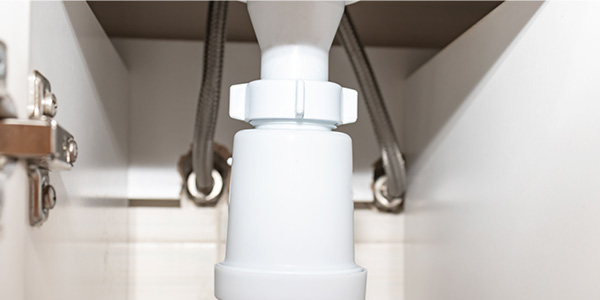
1. Disconnect the Plumbing
- This step is probably what will require the most time. Follow these steps in order to correctly disconnect your plumbing before removing your sink and vanity.
- Turn off the water shutoff valves underneath your sink.
- If your sink’s plumbing does not have a shutoff valve, you’ll need to see if the shutoff valve for your bathroom is located somewhere else in the room or in another room on that floor. If you still cannot find it, you’ll have to shut off your home’s water main.
- Once you’ve shut off the water, unscrew the drain stopper.
- Drain any excess water in your p-trap into your bucket or pasta pot (experts say it’s the perfect size to fit under the trap).
- Loosen nuts to disconnect fittings with your adjustable wrench.
How to Remove a Vanity with Floor Plumbing
The plumbing for most bathroom sinks is usually routed through the wall. But sometimes, especially if the bathroom wall is on an outside wall, the plumbing for your vanity may be in the floor instead. This is often to prevent outdoor temperatures from freezing the pipes. If the plumbing in your vanity is in the floor instead of the wall, use these steps to remove your vanity once you’ve disconnected the plumbing.
- Check the size of the openings cut in the bottom of the vanity.
- If the openings are too small for the shutoff valves to fit through, one option is to remove the valves first before removing the vanity. This will require you to close the next closest water shutoff or turn off the main water supply and place plumbing caps over the supply lines to keep debris out of the pipes as you work.
- If the openings are too small but you do not want to remove the pipe valves, you can cut larger openings into the bottom of the vanity cabinet instead. This is the easiest option, and ideal if you plan on pitching your old vanity anyway.
- If the openings are large enough to accommodate the pipe valves, you can move onto the next steps.
2. Take Down the Vanity Mirror
Now that your plumbing is under control, it’s time to move to the mirror. If your mirror is a separate piece and you are planning on replacing it, take it down before you start the vanity removal. Make sure to put on your gloves and safety glasses and have someone available to help for this step to ensure you can safely remove the mirror without dropping or shattering it.
Removing a Mirror That is Glued to the Wall
- Cover the mirror with packing tape in an “X” shape as a precaution against it cracking during removal.
- Insert your wooden shims in any gaps between the mirror and the wall. Make sure they are snug, but don’t force them in.
- Work your pry bar behind the glass using another shim to protect the wall. Work along the top and sides of the mirror gently, releasing a little bit at a time.
- Support your mirror at the top as you near the bottom to prevent it from fully detaching from the wall and falling.
- Carry your mirror carefully out of the bathroom to your dumpster or safely into another room if you are planning to reuse.
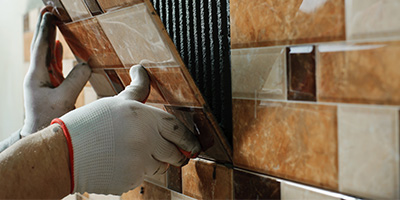
3. Remove Tile or Backsplash
Once your wall is mirror-free, it’s time to remove your tile and backsplash.
- Remove the grout from between the tiles on the backsplash using your grout scraper. This will loosen the tiles and allow you to pry them off one at a time, causing less damage to your wall.
- Separate the caulk between the bottom row of tiles and your countertop.
- Insert your putty knife behind the first tile and wiggle slowly to release the tile from the wall, working in a horizontal line. If needed, you can carefully use a hammer to gently tap the putty knife behind tiles that are really stuck.
- Use your putty knife to carefully scrape off leftover mortar from the wall to leave the surface as smooth as possible.
4. Detach Sink Hardware or Take Off the Vanity Top
Next, it’s time to get rid of your old bathroom sink hardware, or if your sink and vanity top are one piece, take off your entire vanity top.
How to Disconnect Your Bathroom Sink & Hardware
- Remove any clips that hold the sink to your vanity’s countertop and break any caulk or sealant with your utility knife.
- Slowly lift your sink straight up from the counter. Make sure to have your helper on hand to assist lifting it, as sinks can be very weighty.
How to Remove the Vanity Top
- Using your utility knife, cut the caulk lengthwise down the center of all joints. There may also be caulk running down the side of the vanity cabinet, along the wall. Make sure to not cut into the wallboard as you are slicing the caulk.
- Look under your vanity top to see if there are brackets that hold the top the cabinet. If so, unscrew and remove.
- Lift the vanity top free from the cabinets carefully to minimize wall damage.
5. Remove Bathroom Vanity From the Wall
Once the sink and vanity top are gone, you can easily access the vanity cabinet that is left. Figure out where the cabinet is attached to the wall and if the countertop is attached to the wall with screws or nails.
When fasteners are removed, the vanity cabinet should be easy to remove from the wall. If it’s too large to fit through your doorway and you aren’t planning to reuse, you may need to use a reciprocating saw to cut into smaller pieces.
Rent a dumpster to easily get rid of your old bathroom vanity.
6. Clean Up Your Debris and Repair Your Wall
The tough part is over, time to move on to the cleanup and repairing any damage to your walls or floor.
- Assess any damage to your flooring or subfloor.
- Remove any remaining caulk from the wall.
- Repair any damaged drywall.
- Vacuum up any dust or debris left behind.
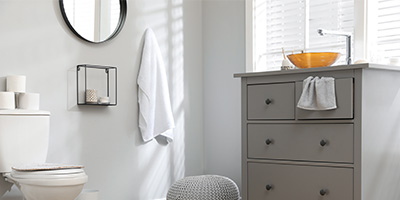
What’s Next?
It’s time for some fresh paint and replacing your bathroom vanity with a new fixture to give your bathroom the update you were dreaming of.
If you are planning on going into full bathroom remodel mode after removing your vanity, check out our complete your own DIY Bathroom Remodel. Only looking to make small updates to your bathroom? The following posts will help you get started.