The Complete Guide to DIY Toilet Replacement
Project Overview
How to Remove and Install a Toilet
Have you recently encountered a hairline crack in your toilet? Is the water in the tank constantly running, resulting in an increased water bill? It’s probably a sign to replace your toilet. Calling a plumber can ensure convenient and professional service, but labor is pricey. If you’re looking to keep costs low, this step-by-step guide will teach you how to remove and install a toilet in no time.
When to Replace a Toilet
There are several different situations that may cause you to replace your toilet. Have you experienced a sudden leak? If it’s not fixable, you’ll need to install a new toilet.
One major motivator for changing a toilet is an extensive bathroom remodel. If you’re stripping down your bathroom to the studs, it’s a good idea to remove your old toilet. With age, toilets can become susceptible to leaks and clogs. Plus, newer toilets are much more efficient than they used to be.
Water conservation is another toilet replacement motivator. You can reduce water use with a more efficient toilet, leading to lower water bills. Low-flow toilets can even help extend the life of your septic system.
“Historically, the toilet has been the single largest consumer of water in a home. We want to make sure older, inefficient toilets are being replaced with a lower flush rate. Water conservation efforts can replace a 3.5 gallon toilet down to 1.6, 1.28 or even 1 gallon.”
William Strang | TOTO USA
How Hard is It to Replace a Toilet?
DIY toilet replacement may seem ambitious, but it’s likely easier than you think. You can replace a toilet yourself without running too many risks and save a decent chunk of change. Most beginners can remove a toilet without difficulty, while installing a new toilet can require a little more involvement.
If you’re nervous about leaks or pipe alignment, consider removing the toilet yourself and getting a plumber for the installation process. Additionally, make sure to call a professional for any plumbing reconstruction.
“If you live in an old community, check that the plumbing system you have can support your new toilet. A dip or belly in your sewer line means it will be less efficient in the drain line carry flow characteristics.”
William Strang | TOTO USA
How Much Does It Cost to Replace a Toilet?
The price of a new toilet can range from $90 to $1,500, depending on what model you choose. Toilet replacement labor costs range widely between $225 and $530, but on average expect to pay around $370. Even if you’re not comfortable installing a toilet, removing it is easy enough to DIY. It’s also an easy way to save money, as toilet removal costs alone can range from $50 to $200. If you’re considering a full bathroom remodel with additional debris, you may also find it worthwhile to rent a dumpster.
How to Remove a Toilet in 7 Steps
1. Gather Your Tools
Before you start removing your toilet, you’ll want to have the right tools nearby. You probably already have all the tools you need for toilet removal around the house, but if this is your first DIY project, now is a great time to build up your essential toolkit.
- Sponge
- Bucket
- Wrench
- Pliers
- WD-40
- Old towels
- Blade
- Screwdriver
- Putty knife
- Heavy rag

2. Drain the Toilet Water
Before removing the toilet, you’ll need to drain any existing toilet water. Make sure to clean the toilet thoroughly first. Locate the water supply line connected to your toilet. Turn the shut-off valve clockwise until it is off. Flush the toilet to empty the tank and bowl. If there’s remaining water, use a sponge to absorb what’s left.
3. Disconnect the Water Supply
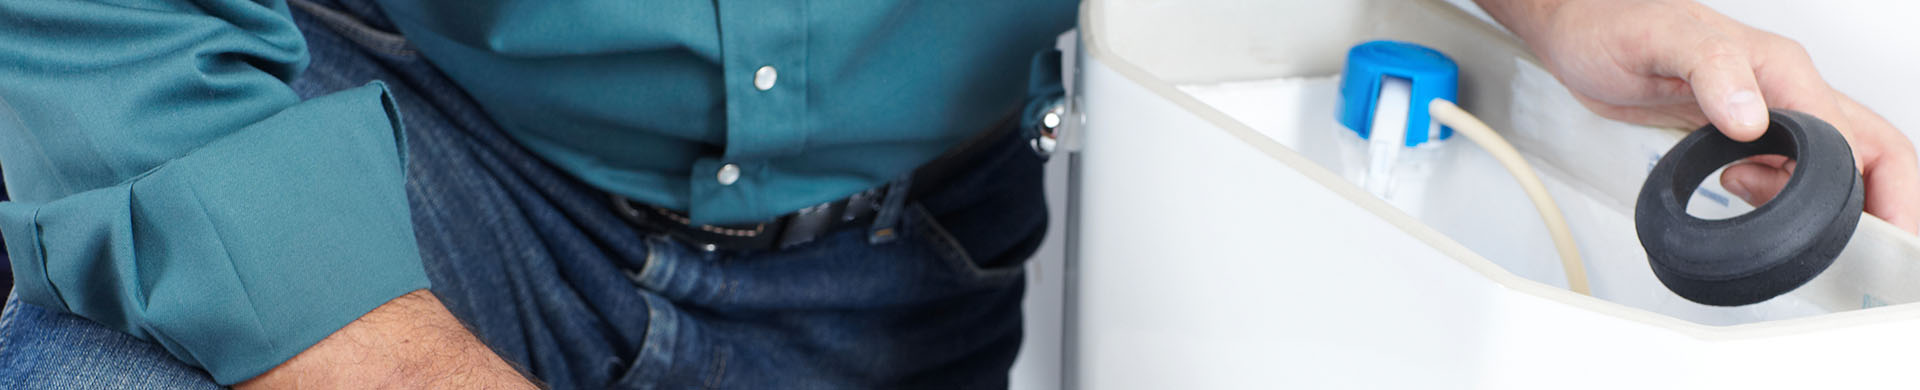
Keep a bucket nearby to collect any draining water from the supply line. Using a wrench and pliers, disconnect the threaded inlet supply line from the toilet tank and shut-off valve.
4. Remove the Toilet Tank
If you have a two-piece toilet, it’s best to separate and remove the tank first. Unscrew the nuts on the bottom of the tank. The tank will sit loosely on the bowl. Lift the tank off of the bowl and set it aside.
5. Remove Floor Fasteners
After you detach the tank, unbolt the toilet bowl from the floor. Remove the caps connected to the toilet to unveil bolts. You may need to pry them off with a screwdriver. Then, use a wrench to remove the nuts and bolts. If the nuts are stubborn, use a lubricant like WD-40 to loosen them.
6. Pull the Bowl
Avoid staining the floor by laying down old towels. If your toilet base is caulked to the floor, cut through the caulk with a blade. Break the seal of your toilet by rocking the bowl side to side. Lift the bowl and set it on its side — an extra set of hands may be helpful for this, as toilets can weigh anywhere between 50 and 120 pounds. Scrape off any existing wax from the bowl with a putty knife.
7. Remove the Toilet Flange
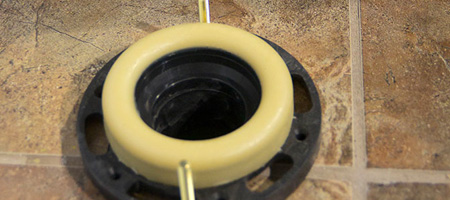
Using a putty knife and rag, clean off the wax layer on the flange. Lift off the rubber lip in the center of the flange. Unscrew the bolts and lift the flange out of the pipe. You may have to chisel the flange out if it is old, but be careful not to break the inner pipe. Once you remove the flange, clean the area around your sewer drain. Plug the hole with a heavy rag until you’re ready to install a new flange.
“The first thing you want to do when you take off your toilet is take a heavy rag, bunch it up and put it into the hole. The toilet itself has a trap that prevents sewer gas from coming into the house. If you leave your toilet flange open, the house will start smelling stinky really quick.”
William Strang | TOTO USA
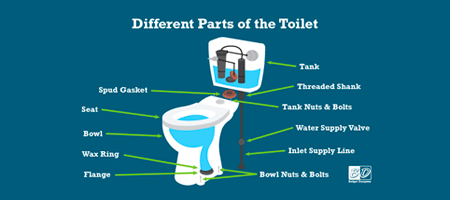
What is a Toilet Flange?
A toilet flange, also known as a closet flange, secures your toilet in line with the drain pipe. It is often made of PVC or cast iron, and is fastened with bolts. On top of the flange is a wax ring that seals to the bottom of the toilet. When you remove the toilet, you’ll notice a hole in your bathroom floor. This is where you’ll find the toilet flange.
“Your closet flange is very important because it has the opportunity to take the water out of the toilet, through the pipe and all the way out to the street.”
William Strang | TOTO USA
Using a putty knife and rag, clean off the wax layer on the flange. Lift off the rubber lip in the center of the flange. Unscrew the bolts and lift the flange out of the pipe. You may have to chisel the flange out if it is old, but be careful not to break the inner pipe. Once you remove the flange, clean the area around your sewer drain. Plug the hole with a heavy rag until you’re ready to install a new flange.
How to Install a Toilet in 8 Steps
Once you detach the flange and your work area is clean, move forward with the installation process. If you want to upgrade your floors from laminate to tile, make sure to complete this remodel before installing your toilet. Floor edges hidden underneath the toilet will look much neater and prevent problems in the future.
1. Gather Your Tools
A new toilet should come with a gasket, wax ring and closet bolts. Check what comes with your toilet first, then buy any of these remaining supplies.
- PVC primer
- PVC cement
- Toilet flange
- Closet bolt set
- Gasket
- Wax ring
- Hacksaw
- Screwdriver
- Wrench
2. Install the New Toilet Flange
While a new toilet comes with most of the parts you’ll need, you may have to buy a new flange separately. Before installing the new flange, confirm that it is 1/4 inch above the finished floor to ensure a stable seal with the wax ring.
“If you place the closet flange below the floor line, you’re going to be unsuccessful in installing a new wax ring. It is important to set the flange correctly, because the toilet wax ring will compress and prevent any sort of leakage from coming out from the toilet and onto the floor.”
William Strang | TOTO USA
Start by removing the rag from the hole. Apply primer to the flange and the outside of the drain pipe. Then, apply PVC cement to the flange and drain pipe. Push the flange onto the pipe and secure the flange by screwing it into the subfloor. Slide in the mounting bolts and lock them with a washer and nut.
3. Install the Wax Ring
Dry set the toilet without a wax ring to make sure it is level. Check that it does not wobble from side to side or front to back. If the toilet is stable, move forward with wax ring installation. The purchase of a new toilet should include a new wax ring. Remove the plastic layer and gently soften the wax ring under warm water. Then, place the wax ring on the flange.
“Before you put the wax ring on, dry set the toilet. Set the toilet and make sure the two bolts come through the holes. Make sure they are aligned correctly, press down on the toilet and make sure it does not rock. If it rocks, your floor is not even.”
William Strang | TOTO USA
4. Install the Toilet Bowl
Pick up the toilet bowl and lower it over the closet bolts. You’ll likely want help from a partner again. Do not rock it back and forth into place to prevent wax ring damage. Make sure the bowl is square with the wall and the base is sitting firmly against the floor. If it does not sit flat, you may encounter leaks in the future.
5. Set the Toilet Bowl
Place a washer and nut on each closet bolt. To keep the pressure even, alternate between tightening one bolt and the other. Do not over-tighten the nuts, or the bowl may crack. If there is excess bolt after tightening, cut it off with a hacksaw. Then, cover the bolts with their caps.
6. Attach the Tank
Now that your bowl is set, it’s time to attach the tank. Insert the tank bolts and washer from the inside of the tank. Install the rubber gasket over the base of the tank. Then, place the tank on the bowl by guiding the bolts into the bowl holes. Tighten the bolts, alternating from side to side using a wrench. Again, do not over-tighten the bolts to prevent a cracked bowl.
7. Install the Seat
Once the tank is level, install the seat. Place the seat over the bowl’s rim and align the hinges over the holes. Depending on your toilet, use a screwdriver to tighten the screws or use a wrench to tighten the bolts.
8. Hook Up Water Supply
Reconnect the threaded inlet supply line to the toilet tank and shut-off valve. Check that you properly thread and tighten the metal nut onto the shut-off valve and thread the inlet supply to the shank. Turn on the water supply valve and allow the tank to fill. Flush the toilet a few times to ensure there are no leaks.
Troubleshooting Leaks
If your toilet is level, doesn’t rock back and forth on the floor, and the flange is sitting 1/4 inch above the finished floor, it’s unlikely that you’ll encounter any major leaks. However, you may notice water seeping from the supply line or base.
If your supply line is leaking, check that the bolts are tight enough. If it is still leaking, take the tank off and ensure the gasket sits properly.
If there is a leak around the base, make sure the nuts are tight enough on the closet bolts. If so, you’ll have to remove the toilet and install a new wax ring.
Read More Like This
Now that you have a new and leak-free toilet, it’s time to consider other ways to upgrade your bathroom. Need inspiration? Check out the following projects.