We’ve rented over 1 million dumpsters
How to Install Hardwood Floors on a Budget
The Complete Guide to DIY Hardwood Floor Installation
Hardwood is arguably the most coveted among homeowners of all the flooring options. Sleek, durable and breathable, hardwood flooring makes a statement in any room. Unfortunately, one peek at the costs of professional installation might make you push hardwood flooring to the bottom of your home improvement wish list — but it doesn’t have to.
If you’re tired of letting installation prices scare you away from your glossy, hardwood dreams, it’s time to take the nail gun into your own hands. Read on to learn how to save money by going the DIY route for buying and installing hardwood floors.
Solid vs. Engineered Hardwood Flooring: What's the Difference?
The first step to choosing hardwood flooring is deciding between solid and engineered wood. While similar in appearance, the two vary in composition, price and moisture resistance, and it's important to pick the right one for your space and project.
1. Solid Hardwood
As the name implies, solid hardwood flooring is made of solid wood. “Solid hardwood floors are very durable,” says Tom Ory, owner of Enterprise Wood Products.
“[The] pricing varies depending on species and finishes, but when you factor in their durability, they are a great purchase,” says Ory. "Having solid hardwood flooring in your home will increase its value, making it an investment as well."
With good maintenance, solid hardwood can last for over 100 years and should be sanded and refinished about once every 10 years.

2. Engineered Hardwood
Engineered hardwood boards are made up of layered wood and plywood. The top and bottom of the boards are thin layers of solid wood, but between them lies a high-quality plywood base.
Engineered hardwood boards are made up of layered wood and plywood and are typically less expensive than solid wood. "Engineered boards will consist of a hardwood top layer that is adhered to plywood or a softwood core," says Jeandre Du Toit, flooring specialist and interior stylist of Studio Jeandre.
The benefit of engineered hardwood is that it is less sensitive to moisture and easy to use in a DIY hardwood installation, saving you money on labor costs.

Two Hardwood Flooring Styles for DIY Installation
While there are many methods of hardwood floor installation to choose from, simplicity is key if you’re installing the flooring yourself. These are the two most popular DIY installation designs for hardwood flooring:
1. Click-Lock Hardwood Flooring
This design is incredibly easy to install, relative to other options. As its name suggests, the end joints are designed to click and lock together without the help of adhesives, which helps your flooring joints hold tightly together.

2. Tongue-and-Groove Hardwood Flooring
While this style is designed the same as click-lock, the end joints for tongue-and-groove flooring do not lock, so you’ll need to nail them down and/or use adhesive to glue the pieces together.

Should Hardwood Floors Be Nailed or Glued?
"Glue-down installation is the preferred method for both solid and engineered flooring and requires an adhesive applied directly onto the subfloor. This method can be used on concrete and timber subfloors, providing an extremely stable floor when done properly, although it will require a slightly longer overall installation process."
Jeandré Du Toit | Studio Jeandré
Hardwood Floor Installation Costs
Hardwood flooring costs can vary depending on a wide variety of factors, including wood type, finish, board thickness, grain quality, demand and design type. According to Architectural Digest, the average cost of hardwood flooring installation ranges between $6 and $21 per square foot. Homeowners going the DIY route should also consider the cost of tools they’ll need to buy or rent when budgeting for the project. We’ve broken down the average costs of materials and installation by types of hardwood flooring.
Breaking Down Wood Flooring Cost
Engineered Hardwood Flooring Costs
On average, you can save anywhere from $1,200 - $3,200 depending on the engineered hardwood you choose and the amount of flooring you plan to lay down. This cost doesn't account for the costs of tools and the time you may spend on the project.
Flooring Material | Cost of Wood (per sq. ft.) | Cost With Installation (per sq. ft.) | Cost for DIY Installation (400 sq. ft.) | Cost for Professional Installation (400 sq. ft.) |
|---|---|---|---|---|
Oak | $3 - $8 | $6 - $16 | $1,200 -$3,200 | $2,400 - $6,400 |
Bamboo | $4 - $8 | $7 - $16 | $1,600 - $3,200 | $2,800 - $6,400 |
Hickory | $3 - $9 | $6 - $17 | $1,200 - $3,600 | $2,400 - $6,800 |
Maple | $4 - $9 | $7 - $17 | $1,600 - $3,600 | $2,800 - $6,800 |
Birch | $3 - $8 | $6 -$16 | $1,200 - $3,200 | $2,400 - $6,400 |
Solid Hardwood Flooring Costs
For this type of flooring, you can save anywhere from $1,200 - $3,200 on average. Keep in mind that this depends on the size of the space you're flooring. This rate doesn't account for the costs of tools and the time you may spend on the project.
Flooring Material | Cost of Wood (per sq. ft.) | Cost With Installation (per sq. ft.) | Cost for DIY Installation (400 sq. ft.) | Cost for Professional Installation (400 sq. ft.) |
|---|---|---|---|---|
Oak | $4 - $10 | $7 - $18 | $1,600 - $4,000 | $2,800 - $7,200 |
Bamboo | $6 - $8 | $9 - $16 | $2,400 - $3,200 | $3,600 - $6,400 |
Hickory | $5 - $9 | $8 - $17 | $2,000 - $3,600 | $3,200 - $6,800 |
Maple | $6 - $10 | $9 -$18 | $2,400 - $4,000 | $3,600 - $7,200 |
Birch | $4 - $8 | $9 - $16 | $1,600 - $3,200 | $3,600 - $6,400 |
“Once you pick a species, you can then determine if you want to keep the floor natural with just a clear finish or add some color by staining it. You will also need to determine what widths you want your flooring to be. Some people prefer a random width pattern while others like their flooring to be all one width.”
Tom Ory | Enterprise Wood Products
Tips for Buying Hardwood Flooring
Engineered Wood | Solid Wood | Click-lock vs. Tongue-and-groove |
|---|---|---|
Engineered hardwood is less expensive than solid hardwood on average. | Solid wood can be refinished more over its lifespan, while engineered is much less sensitive to moisture. | Tongue-and-groove flooring is more time-consuming to install but tends to be less expensive than click-lock. |
Engineered hardwood is often preferred for DIY installations due to its design and durability. | Solid hardwood is usually not recommended for DIY installations due to its tendency to move and expand. | Click-lock flooring is easy to install, making it ideal for low-budget hardwood floor DIY projects. |
You can’t use solid hardwood for installations over concrete — you must use engineered wood. | ||
Installing hardwood floors yourself takes preparation and time, but is a great way to cut hardwood flooring costs.
“If you decide to install yourself, you could save money by purchasing your floor materials from a floor wholesaler instead of a carpet and flooring retailer or one of the big box stores.”
Kristin Warner | Floor Critics
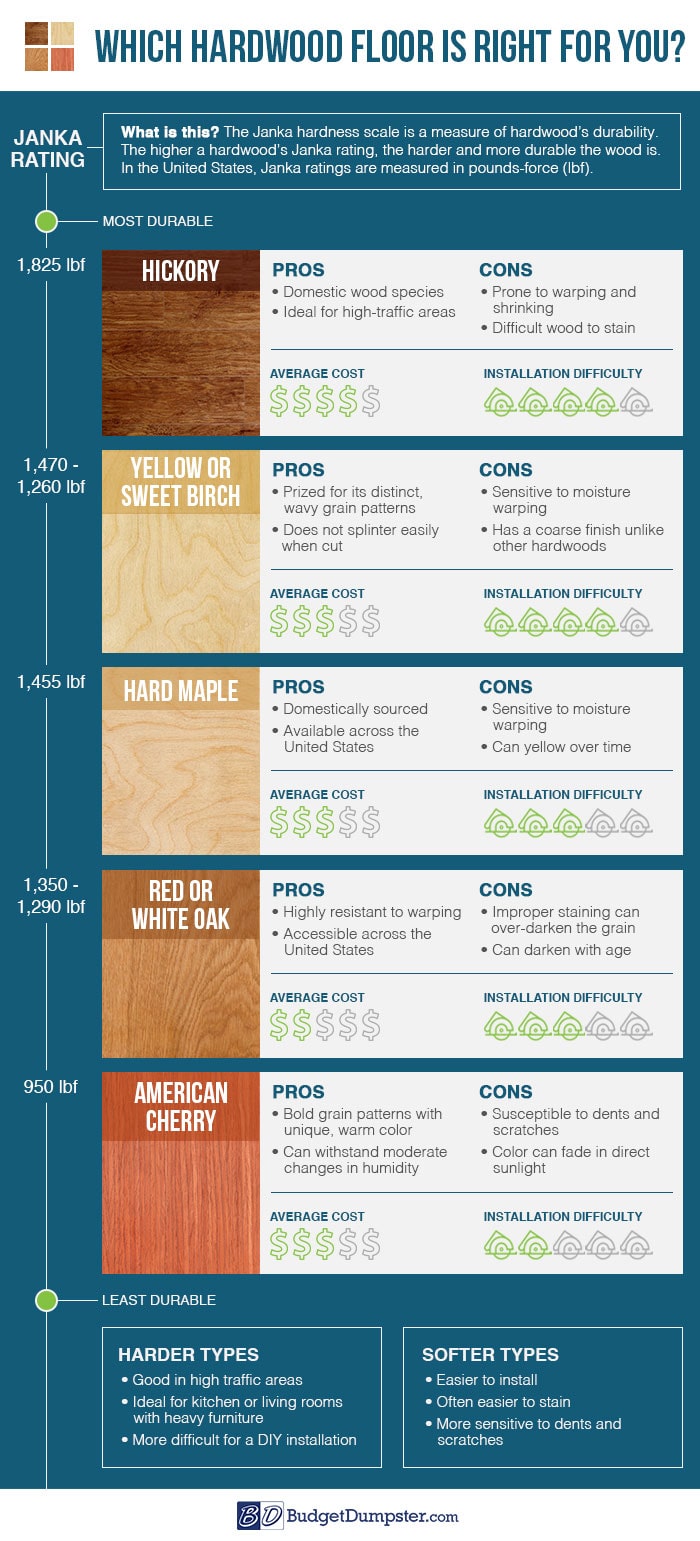
Which Type of Hardwood Flooring Is Right for You?
While we’ve outlined the price of different types of hardwood flooring above, you can also use this hardwood flooring infographic for more information.
View Our Hardwood Flooring Infographic
Our Pick for DIY Hardwood Floors: Engineered Oak
Engineered oak hardwood is a relatively inexpensive yet durable hardwood flooring option for a DIY installation. Choosing prefinished engineered oak hardwood eliminates the cost and effort of finishing the floors once they’re installed.
You can save even more money by choosing tongue-and-groove planks, or you can save yourself some time and effort by choosing a click-lock design. Whichever design you choose, you’ll be well on your way to installing beautiful, budget-friendly hardwood floors — and we’ll show you how to do it.

How to Install Hardwood Floors
1. Prep Your Workspace
Before you start working, we recommend removing all items from the room you’ll be working in, including any hanging pictures or decorations, as they will collect dust during the installation process.
Remove Existing Flooring
Before installing your new hardwood floors, you’ll need to remove the existing flooring. Whether you’re removing carpet, laminate or tile, we have step-by-step guides to walk you through the process.

Tip: Plan for Flooring Disposal Ahead of Time
Need a quick, efficient disposal solution for your old flooring? A 10 yard dumpster is usually best for a residential flooring removal project. Learn more and order online today.
Prepare Your Subfloor
Without a proper base, your new flooring won’t have the support it needs. Make sure the subfloor is in good condition and the area is moisture-free, level and clean before you dive into your project. Remember that it's best to run your boards perpendicular to the floor joists beneath your subfloor. If you have to run them parallel, you can install another layer of plywood for added strength. “Also, be very conscious about the subfloor you install on,” says Kristin Warner of Floor Critics. “Never install over heated floors or fresh concrete.”
You’ll also want to prepare any doorways ahead of time. If your hardwood flooring will sit higher than the bottom of your door jamb, you’ll need to cut it so the planks can sit underneath.

"Make sure that your subfloor is level. Installing a new wood floor will only mask any unevenness or subfloor issues for a while, it's best to address it. Be prepared that you may have to have the existing flooring uplifted and have a new plywood subfloor installed. If you have a concrete subfloor, ensure the moisture content is below 4% before installing."
Jeandré Du Toit | Studio Jeandré
Bring in Your Flooring Materials
Measure the square footage of the room by multiplying the length by the width. Purchase about 10% more material than needed to account for warped or flawed boards. Let the boxes sit for 72 hours to allow the material to acclimate to moisture in the room.
Some experts say it’s best to take the boards out of the boxes, as it allows the air to hit all sides. This is also the time to make sure you’re prepared with some essential DIY tools before proceeding to the installation steps.

Remove Your Baseboards
This step is optional, depending on the look you’re going for, the condition of your baseboards and your project’s timeline. If you’d like your hardwood flooring to sit flush underneath your baseboards, you’ll have to remove the baseboards before installation and adjust their height accordingly. However, if your baseboards are old or you don’t have the time to remove them, you can install trim or quarter-round molding directly to your baseboards to hide the expansion gap.

2. Map Out Your Flooring
For a seamless look all the way through, you’ll want a strategy laid out beforehand. Here are a few tips for a strong hardwood floor setup:
Mark a Starting Line
For flooring that’s square to your room, you’ll need to create a starting line for reference. First, measure and mark the center of each wall. Next, snap a chalk line between both sets of walls to find the center of the room — it should look like a set of crosshairs on your subfloor. Then, measure from the middle of the crosshairs to the wall you want to start with. Subtract the space for your expansion gap, and mark a line from this distance parallel to your starting wall using a chalk line. This will give you a straight, square starting line.
Leave an Expansion Gap
An expansion gap is a small space around the perimeter of your room that allows hardwood flooring to expand and contract with moisture and temperature changes. “One of the most common mistakes [made during hardwood floor installation] is not leaving enough room for wood expansion, as the planks will expand and contract with changes in humidity throughout the year,” says flooring expert Kristin Warner.
Expansion gaps are typically about 12 to 15 millimeters wide, though the recommended size will depend on the species of wood you’re working with. When you purchase your flooring, check the packaging for its recommended expansion gap.
Make Cuts for Your End Rows
Plan for your first and last rows ahead of time to prevent awkward gaps or skinny partial boards at the end of your installation. To do this, measure the width of your room, subtracting your expansion gap. Then, divide this measurement by the width of your flooring planks. This will tell you how many full boards will fit and how much space will be left over. Divide this leftover space by two to find the proper width of your first and last boards.
Example: Your room is 12 feet wide (after subtracting both expansion gaps), and your planks are 5 inches wide. You can fit 28 full planks, with 4 inches to spare. This means your first and last boards should be 2 inches wide.
Keep in mind that the minimum width for a hardwood plank is 2 inches. Wait to cut your final row until it's time to install it — this will ensure you get the most accurate measurement. Lastly, when cutting your end boards, be sure to use the tongue end for your starting row and the groove end for your ending row.
Rack Your Boards
Racking, or laying out your boards beforehand, will give you a good idea of your final layout. Use the longest, straightest pieces for the starting line, with the tongue side facing the wall. Remember, you’ll need to lay your boards perpendicular to your floor joists; install another layer of plywood subfloor. Mix and match boards from different boxes for a more natural, varied look, and view the layout in good lighting to make sure you like it before installation.
How to Avoid Bad Racking
When racking hardwood boards, it’s important to line your end joints — also known as seams — correctly for a structurally sound, beautiful floor pattern. It’s recommended that end joints be spaced at a distance three times the width of the plank — so if your planks are 5 inches wide, the joints should be spaced about 15 inches apart, especially for your first and last four rows. However, if your room is smaller, it may limit your joint spacing capabilities, so at the very least, make sure the joints are spaced a minimum of 6 inches apart.
"H" seams are unsightly and structurally unsound. To avoid an "H" seam, do not line up end joints unless there are at least two rows of boards between them. For the same reasons, avoid "lightning bolt" or "stair-step" seams as well.
Tip: Check for Flawed Planks
Because hardwood is a natural product, it’s normal to have a few faulty pieces in your supply. Don’t throw them away — you may be able to cut the damaged parts off and use the rest in your installation.
3. Install Floorboards: Three DIY Installation Methods for Hardwood Flooring
Now that your room is prepped, it’s time to get started on your DIY hardwood floor installation. The method you use to install the floors will depend on your subfloor and the type of product you’ve chosen for your project.
There are three methods to install engineered hardwood: floating, nail-down and glue. We’ll walk you through how to install hardwood floors using each method.
The Floating Hardwood Installation Method
This is the simplest of the three methods, making it an ideal choice for a DIY install. Floating hardwood floors require no nails, and they can easily be installed over vinyl surfaces. This method is only recommended for engineered hardwood products.
Floating Hardwood Floor Installation Tools:
- Tape measure
- Miter saw
- Hand saw
- Tongue-and-groove adhesive
- Pull bar
- Hammer
- Installation spacers
- Mallet and tapping block
- Painter's tape
1. Lay your first row of boards, tongue side against the starting wall.
To maintain the expansion gap, place spacers between your first row and the wall. If using click-lock, simply click the boards into place. For tongue-and-groove planks, run a bead of wood glue along the groove side of the end joints and long sides before linking each piece.
2. Working your way left to right, lock each plank into one another tightly.
If you’re using tongue-and-groove flooring, you can use painter’s tape to secure your planks while the wood glue sets. For either type, you can use a mallet and tapping block to tap the pieces together without damaging your new flooring.
3. Make the final plank fit in the first row.
At the end of row one, you may need to cut a piece with your miter saw to make it fit. When cutting hardwood planks, remember to keep your wood face up, and to cut the correct end joint — you don’t want to cut for a groove joint when you really need a tongue joint.
4. Continue locking or gluing your pieces.
As you keep working, remember to stagger your end joints appropriately. Cut around permanent obstacles in the room such as radiators or floor vents, including an expansion gap around them as well.
5. Cut your plank to width for the final row.
To measure, lay your final plank face up on top of the last board installed. Make sure the tongue is facing the end wall. Place a scrap piece on top of your plank, pressed against your wall spacers. Use a pencil to trace a line down your final plank. With your saw, cut along this line while your plank is face up. Repeat for all end planks.
6. Use a pull bar and hammer to lock your last row into place.
You’re in the home stretch. For tongue-and-groove flooring, keep your painter’s tape and spacers in place, and stay off it for 24 hours so the glue can set.
The Nail-Down Flooring Installation Method
The staple or nail method is the most common way to install hardwood flooring and can be used both for engineered and solid hardwood installations. It works best for 3/8-inch to 5/8-inch flooring. Nailing hardwood floors improperly can damage your floor planks and potentially ruin your entire layout, which is why it’s important to understand how it’s done before getting started.
Nail-Down Hardwood Floor Installation Tools
- Pneumatic flooring stapler
- Air nailer (used for face nailing)
- Hammer, nail setter and handheld drill (if not using pneumatic stapler and air nailer)
- Installation spacers
- Mallet and tapping block
- Wood glue
- Pull bar
- Jigsaw
- Wood putty
Nail-Down Installation Tips & Tricks
1. Choose a Fastener Type
Staples, regular nails and cleat nails are all commonly used in hardwood flooring installations. Staples are much cheaper than cleat nails and work well in woods like oak.
2. Choose the Right Nail or Staple Size
Typically, 1.5 inch nails or 1 to 1.5 inch staples are used on engineered hardwood, depending on its thickness.
3. Rent the Right Tools
Whichever fastener you choose, you’ll need to rent or buy the right machine and a compressor to install it — unless you’re nailing by hand.
4. Learn the Art of Blind Nailing
Blind nailing is driving your nails into the tongue of your plank at a 45-degree angle. Doing this allows you to hide the nails using the other planks. Pneumatic flooring nailers are designed to do this easily, but you’ll have to do your first and last boards by hand, as your nailer won’t be able to reach the planks closest to your wall.
5. Know When to Hand Nail and When to Face Nail
When nailing planks that are in tight spaces, you may need to hammer in your nails or staples by hand. You also may need to adjust where you're hammering those nails in.
You can blind nail by hand, if there's room for the hammer; but if not, you may have to face nail — or nail directly into the top of —the planks that are in too tight a spot.
Five Steps to Nail-Down Hardwood Floor Installation
Now that you know the basics, it’s time to start your installation.
1. Start with your straightest boards, groove side to the wall on your starting line.
Make sure your spacers are in place to maintain your expansion gap.
2. Using the air nailer, begin face-nailing your first row.
Face nail your first row about half an inch from the edge and 1 to 2 inches from the ends. Space your nails about 6 inches apart.
3. Tap your next row into place with your tapping block and mallet.
Using the air nailer, blind nail your second-row planks, making sure to countersink the nail heads so they sit evenly with the rest of the surface.
4. Use a pneumatic flooring stapler or nailer for the third row and beyond.
These devices are designed to make nail-down hardwood installations much faster and easier. To nail the plank, simply line up the tongue with the arrow on the baseplate and hit the trigger — or buffer.
5. Use a pull bar to pull your boards in the last few rows into place.
Your last few rows will be too close to the wall to use the pneumatic stapler, so you can use a pull bar to pull these boards into place and nail them down. If your final board is a tight fit, you can glue it to the last board installed. Allow the glue to dry at least 24 hours before allowing foot traffic.
What Is Countersinking?
Countersinking is ensuring that the head of a nail, staple or screw sits just slightly below the surface of the wood around it. It’s important to countersink the nails or staples used to fasten your hardwood flooring because if they sit higher than the wood’s surface in the grooves, it will prevent your pieces from connecting correctly. If your face nails sit higher than the wood’s surface, they can be caught on furniture or shoes, causing damage to your floors. For countersunk face nails, use wood putty to smooth out the surface.
Countersinking With Pneumatic Nailers:
First practice nailing or stapling on a scrap piece of flooring, and adjust your compression until the staples are sunk properly into your boards.
Countersinking by Hand:
Drill pilot holes, and use a nail setter to avoid damaging the surface of your new flooring.
The Glue-Down Method
This method is the best choice for existing concrete floors, such as in your basement. Engineered hardwood is the only type of hardwood flooring that can be installed over concrete.
Glue Hardwood Floor Installation Tools
- Plastic gloves
- Moisture-resistant flooring adhesive
- Sponge and wood-friendly cleaner
- V-notch trowel
- Weights
- Painter's tape
- Tapping block and mallet
- Installation spacers
- Scraper
- Pull bar
Five Steps to Glue Hardwood Floor Installation
1. Prepare the area for gluing.
Before beginning, be sure to scrub, grind and vacuum away any substances that might prevent the glue from sticking.
2. Spread the flooring adhesive with your trowel.
Only apply enough for a few rows at a time — you have to be able to reach the first row you’re working with, without getting stuck.
3. Install the first row along your starting line and up against your spacers.
Use your tapping block and mallet to tap the second row into place. Avoid smearing the pieces through the glue too much, as this can reduce its adhesiveness. Wipe away excess glue as you go, using a lightly dampened sponge and wood-friendly cleaner.
4. Continue installing the remaining boards.
Keeping your end joints spaced properly and the planks tight, repeat the previous step for each row to install the remaining boards.
5. Install the final row using a pull bar and hammer.
Once the final row is in place, allow the glue to finish drying for 24 hours. Avoid foot traffic during this time.
Tip: Be Mindful When Gluing Hardwood Floors
When gluing hardwood floors, remember that any adhesive you apply takes about an hour to set. You’ll need to prevent your boards from moving during this time so they can adhere properly. You can use painter's tape to hold boards together while you work but do not leave it on overnight. Use weights to keep any bowed boards from popping up and away from the glue.
4. Add the Finishing Touches and Clean Up
Once your installation is completed and your glue is dry, it’s time to put the finishing touches on your brand-new flooring.
Reinstall Baseboards
If you chose to remove your baseboards, now’s the time to reinstall them. Reusing your original baseboards is a great way to save money on hardwood flooring installations.
Install Molding
If you chose to keep your baseboards on during installation, you can use molding to cover your expansion gaps. Nail the trim directly to the baseboard — not the flooring.
Install Transitions
If your hardwood floors butt up against another room that’s a different material or height, you’ll need to install “T” molding transitions to create a smooth surface.
Sweep and Clean Your New Floors
Once your trim is installed, sweep away the dust and mop with a wood-friendly floor cleaner. Congratulations — you’re finished installing your hardwood floors!
For Your First DIY Hardwood Floor Installation, Take Your Time
With the right preparation, anyone can budget hardwood floors into their home improvement plans. But if this is your first time completing an engineered hardwood floor installation, give yourself plenty of time to work. Installing hardwood floors can be a fairly involved process, even with the simpler designs and installation methods, so it’s best to work at your own pace to avoid major mistakes down the line.
If you have questions about your flooring material or how to install it properly, call or email the manufacturer of your engineered hardwood flooring. They’ll be happy to let you know the specifics about your product and the best way to install it.
Installing hardwood floors as part of a larger home remodel? Be sure to check out some of our other helpful DIY guides: